PrimeWeld TIG225X Best Settings Guide
(Carbon, Chromoly, Stainless, and Aluminum)
If you just bought a PrimeWeld TIG225X, one of the first questions you probably have is:
“What settings should I use?”
How to Get the most out of a Torch Switch
When you use a foot pedal, settings become simple.
You can ignore most of the knobs.

PrimeWeld TIG225x full FAQ page here
The truth is there is no magic bullet setting that works for every single situation.
But the good news is that this simple settings guide page will help you get your settings right for 99% of everything that comes along.
This guide will give you simple settings for welding:
- Carbon and low alloys steels like 4130 chromoly and others
- Stainless steels like 304L, 316L, 321, 400 series and others
- Aluminum alloys like 3003, 5052, 6061, and others
- Titanium alloys
Once you start with these settings, you can fine-tune things based on how the puddle behaves.
3 Simple Rules of Thumb for TIG Settings
- AC for aluminum
- DC for Carbon Steel, Stainless and almost everything else
- There are very few exceptions to rules 1 and 2
TIG225X Settings for Carbon Steel using the foot pedal
Carbon steel is the easiest metal to TIG weld and a great place to start if you’re learning.
Process
DC TIG
DCEN (Direct Current Electrode Negative)
Make sure your TIG torch is plugged in to the EN Negative (-) port with the torch icon.
Typical Settings for fillet welds like laps and tees ( outside corners need less amps)
How to TIG weld Stainless Steel
|
Metal Thickness |
Amperage |
Tungsten |
Filler Rod |
Gas Flow 2-3 CFH per cup size |
|
.060" |
60 amps |
1/16" or 3/32” |
ER70S-2or6 1/16" |
#8 cup 16-24 cfh |
|
.090" |
90 amps |
3/32" |
ER70S-2or6 1/16" |
#8 cup 16-24 cfh |
|
.125" |
125 amps |
3/32" |
ER70S-2or6 3/32" |
#10 jazzy cup 20-30 cfh |
|
3/16" |
150 amps |
3/32" |
ER70S-2or6 3/32" |
#12 furick cup 24-36 cfh |
TIG225X Control Settings
Make sure to Set the 2t 4t switch to 2t when using foot pedal
Pre-flow:
0.5 seconds
Post-flow:
5–7 seconds
Foot pedal takes care of the upslope and downslope so set those knobs to ZERO
Pulse:
OFF (not necessary)
Pro Tip
Whether you are TIG welding carbon, stainless, aluminum, titanium, or any other metal, getting the best results is about clean metal, using the right amperage, arc length, torch angle, and travel speed.
A good rule of thumb for amperage:
Use roughly 1 amp per thousandth of thickness.
So 1/8" steel (.125") usually needs around 125 amps.
A good rule of thumb for arc length:
Arc length should be same as tungsten diameter or slightly less.

Torch angle should be about 15% but torch angle is very forgiving provided arc length is tight enough.
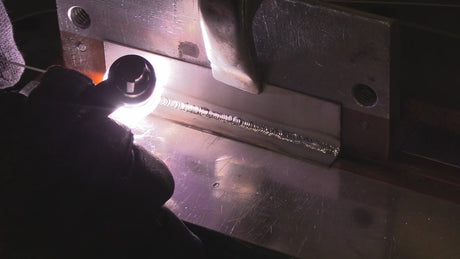
Using the PrimeWeld TIG225X to weld carbon steel comparing different filler rods
TIG225X Settings for Stainless Steel
Stainless steel welds very similar to carbon steel but heat builds up quicker and it holds heat longer.
Usually, Slightly less amperage is needed for stainless
Getting the puddle started quickly and getting the puddle moving is a key to avoiding heat buildup.
Using a PrimeWeld TIG225x to weld sanitary stainless tubing
Process
DC TIG
Polarity
DCEN
Typical Settings for stainless fillets welds like laps and tees ( outside corners require slightly less amps)
|
Metal Thickness |
Amperage |
Tungsten |
Filler Rod |
Gas Flow |
|
.060" |
45 amps |
1/16" |
ER308Lfor 304L |
#8 gas lens cup 16-24 cfh |
|
.090" |
70 amps |
1/16" |
ER308Lfor 304L |
#10 jazzy cup 20-30 cfh |
|
.125" |
100 amps |
3/32" |
ER308Lfor 304L |
#12 furick cup 24-36 cfh |
TIG225X Control Settings for when using foot pedal
Pre-flow:
0.5 seconds
Post-flow:
7–10 seconds
Set boty upslope and downslope knobs to ZERO and use foot pedal
Pulse (optional):
Set to OFF
Pulse can Help on Stainless...Sometimes
Pulse can help:
- control heat
- prevent warping
- make timing filler rod easier
But remember something important:
Nearly Anything you can weld with pulse can also be welded without pulse.
Pulse is a tool — not a requirement.
TIG225X AC Balance and AC Frequncy Settings for Aluminum
Aluminum is where the AC controls on the TIG225X really shine.
The 2 main settings for TIG Welding aluminum are
- AC Balance
- AC Frequency
Aluminum conducts heat extremely fast, so you will typically need more amperage than steel.
Process
AC TIG - Set AC DC switch to AC
Typical Settings
|
Aluminum Thickness |
Amperage |
Tungsten |
Filler Rod |
Gas Flow 2-3 CFH per cup size |
|
.060" |
75 amps |
3/32" |
4043 or 5356 are the most common but consult a filler metal chart |
10-15 cfh #5 cup |
|
.090" |
110 amps |
3/32" |
44043 or 5356 are the most common but consult a filler metal chart |
12-18 cfh #6 cup |
|
.125" |
140 amps |
3/32" |
4043 or 5356 are the most common but consult a filler metal chart |
14-21 cfh #7 cu |
|
3/16" |
180 amps |
1/8" |
4043 or 5356 are the most common but consult a filler metal chart |
4-21 cfh #7 cup |
AC Settings
AC Frequency:
100–120 Hz lower AC frequency settings can help on thick aluminum
AC Balance:
65-70% EN
These AC settings work well for most aluminum jobs.
What These Settings Do:
AC Balance
Controls cleaning vs penetration.
More Cleaning =
- Hotter tungsten
- More cleaning cleaning action from the EP portion of the AC current
AC Frequency
Higher frequency = tighter more focussed arc.
Helpful for:
- Tight fillet weld joints
- welding near edges
Pulse Settings for Aluminum
Pulse is not necessary but can be used as a training tool to help beginners establish a rhythm for adding filler metal.
Shielding Gas and flow rate Settings
For almost all TIG welding on the TIG225X use:
100% Argon
Typical gas flow rate usually depends more on cup size than metal welded:
2-3 CFH per cup size will get you close
So a #10 cup would need about 20-30 CFH
A #5 cup might only require about 10-15 cfh
Gas lens setups may require slightly less flow but you should test it on scrap
Tungsten Recommendations
I prefer to use 2% lanthanated for all my tig welding to keep things simple but there are other good choices
These tungsten types work well for almost everything on the TIG225X.
|
Tungsten Type |
When to Use |
|
2% Lanthanated |
Excellent all-purpose tungsten |
|
E3 Purple |
Great for AC and DC |
|
Ceriated |
Good for low amperage work |

TIG Cup Recommendations
General rule of thumb for TIG cups
#4-8 for Aluminum
#8-12 for carbon and stainless
*there are always exceptions like using a small cup to conserve argon while doing a bunch of tack welding
Video Showing what cup works best for what along with our BEST in Class Stubby Gas Lens Kit

TIG Cup TIPS
- a #7 or #8 gas lens cup works great as an all around cup for both AC and DC TIG
- #6 gas lens cup is a good all around cup for Aluminum
- Jazzy10 ceramic or Furick 12 ceramic with a gas lens setup provides better coverage for chromoly and stainless and also whenever a long tungsten stickout is needed
Weldmonger Challenger Kit below is Designed to be a Huge upgrade for Your 17 air cooled TIG torch that comes with the TIG225X

Many welders prefer clear cups because they allow you to see the puddle better.
Some welders get by with a #5 standard collet body for aluminum up to 1/8” thick and a Furick #12 ceramic for carbon, chromoly, and stainless.
Final Advice
The most important thing to understand about TIG welding is this:
Settings matter… but metal prep and technique matter more.
If your tungsten is sharp, your metal is clean, and your arc length is tight, the TIG225X is capable of producing excellent welds on steel, stainless, and aluminum.
Start with the settings above, watch how the puddle behaves, and adjust from there.