Practicing TIG Welding Stringer Beads on Carbon Steel Flat Plate

If you want to get better at TIG welding carbon steel, there’s one drill that every welder — from students to seasoned pros — comes back to:
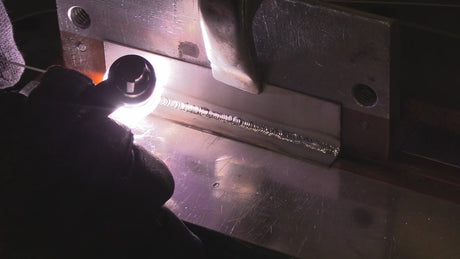
And that drill is running consistent stringer beads on flat plate. It may not be flashy, but it’s one of the most effective ways to improve your hand control, arc stability, and filler timing. In this article, you’ll learn how to set up the drill, what to focus on, and how to evaluate your progress.
🎯 What’s a stringer bead?
A stringer bead is a straight weld bead with no weaving or side-to-side motion. It’s the foundation of good TIG technique — clean, simple, and the backbone of building tig welding skills.
Running consistent stringer beads teaches:
- Steady travel speed
- Tight arc length
- Precise filler placement
- Consistent torch angle
- Amperage control with either foot pedal or torch control
When you can lay down 20 uniform stringer beads in a row, you’ve built the muscle memory needed to tackle more complex joints.
🧰 What you need for the drill
- A piece of mild steel plate, approx. 3" x 6" or larger, 1/8" to 3/16" thick
- 1/16" ER70S-2 or ER70S-6 filler rod
- A sharpened 3/32” 2% thoriated, 2% lanthanated, 2% ceriated tungsten, or E3 tungsten
- 100% argon shielding gas set at 15–20 CFH ( or 2 to 3 CFH per cup size)
- Cup size #6–#8 with gas lens (optional, but recommended)
⚙️ Machine settings: Start at around 110–125 amps for 1/8" thick plate (DCEN), adjust as needed for thicker plate
🔄 Step-by-step stringer bead drill
1️⃣ Clean the plate thoroughly
Grind off mill scale, wipe with acetone. Clean steel = clean arc.
2️⃣ Tack weld the plate to a backer or work surface ( optional but recommended)
This keeps it from moving and helps with heat sinking. Flat bar or scrap angle iron works well.
3️⃣ Run your first dry pass (no filler)
Practice moving the torch evenly down the plate without starting an arc. Focus on:
- Keeping a tight arc gap (1/8" or less)
- Holding a consistent torch angle (10–15° push angle)
- Moving at a steady pace
Repeat until your motion feels smooth.
4️⃣ Strike an arc and run a small puddle without filler
Focus on holding a tight, semi round puddle with no wandering. Move slowly and try to maintain a consistent size weld puddle…and also pay attention to how the puddle behaves.
After 10- 20 passes without filler metal progress to adding filler metal.
5️⃣ Run your first real bead (with filler rod)
- Start the arc and get the puddle going
- Once puddle is the right size (1/4” to 3/8” wide on 1/8” to 3/16” thick steel) Dab filler into the leading edge of the puddle, move ahead and pause and dab filler again. keep doing this
- Keep the torch moving and filler feeding in rhythm
Don’t rush. The goal isn’t speed — it’s consistency. Speed will come later when you are very comfortable with welding beads.
👁️ What to watch for
- Bead width should be uniform from start to finish
- Ripples should be evenly spaced
- Puddle should stay centered under the arc
- No undercut, underfill, or excess buildup
- Ends of beads should taper smoothly — no craters or blobs
🔁 How to practice like a pro
-
Divide the plate into lanes
Use a scribe or soapstone to draw 6–8 lines across the plate — each one a path for a single bead. Run a stringer in each lane. -
Use a video to self-critique
Record your hand movements if possible —odds are you will see something you didn’t notice while under the welding hood. -
Alternate directions and use both hands
Practice welding left-to-right and right-to-left if you're right-handed (or vice versa) to build ambidexterity. This not only trains your non dominant hand but also requires you to concentrate better on the puddle, and to stay focused. -
Compare beads
After each pass, evaluate and compare. Try to identify and correct mistakes why before starting the next.
🧠 Beginner mindset: Progress, not perfection
Don’t expect every bead to be flawless.
What matters is your consistency over time. The more you build muscle memory and visual control, the better your welds will become in real-world joints.
📌 Summary
Practicing stringer beads on flat plate is like practicing scales on a guitar or practice swings with a golf club or baseball bat— it's the simplest way to build the control you’ll use in every real weld. Focus on torch angle, arc length, and filler timing, and don’t move on until you can repeat good beads with consistency. When in doubt, come back to this drill — it’s how welders sharpen their edge.