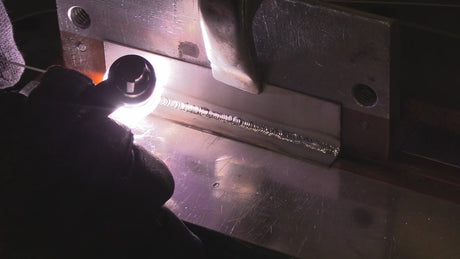
TIG Welding Aluminum
Do these 10 Things Right and You Won't go Wrong
1. Right metal prep ..Make sure metal is clean enough

How clean is clean enough for tig welding aluminum?
The answer is “it depends”.
There is a difference in brand new aluminum sheet that has been stored indoors and an aluminum handrail that was on the beach.
And there is also a big difference in a simple fillet weld on square tubing and a welding test that gets X rayed. Act accordingly.
Not every aluminum weld joint needs wire brushing, abrasive cleaning, carbide burring, or even a solvent wipe.
For some applications, the metal is clean enough to weld without doing anything.
Next time you see an aluminum truck box made from polished tread plate, or a tuna tower, notice the lack of wire brush or grinding marks next to the welds. Brush marks are not tolerated on many aluminum products.
This is where textbook best practice and real world application often differ.
2. Right type and size tungsten


There are several types of tungsten electrodes that work well for tig welding aluminum.
Old text books and technical documents referenced old transformer design machines along with pure tungsten.
The main reason for pure tungsten was the smooth ball you can achieve with pure tungsten .
The problem with pure tungsten is that it just won’t handle much amperage.
So that often translates into using a bigger diameter.
These days, there are several better choices than pure that all work great and handle way more amperage.
In my opinion the best 3 tungsten choices for tig welding aluminum are:
2% lanthanated seems to carry more amperage on AC than LayZr or E3 and because it works well on DC so I can simplify things by using only one type of tungsten.
The 2 main cons of 2% lanthanated are:
- Does not stay sharp as long as 2% thoriated or 2% ceriated for DC welding.
- Tip sometimes mis-shapes at higher amperage on AC
LayZr (chartreuse) from CK Worldwide is also a good all around tungsten for both AC and DC TIG welding.
Pros: holds tip shape well at medium amperage on AC.
Good arc starts at low amps on DC and stays sharp a long time on DC
Cons: Won’t carry as much amperage on AC as 2% lanthanated
E3 (purple) seems to perform exactly the same as LaYZr
3. Right tungsten prep

There are several ways to prep a tungsten tip for aluminum welding.
Sometimes I just sharpen the tip just like I would for DC welding and let the tip ball however it wants to.
But if you are welding up near the top end of the amperage range for a given electrode diameter, rounding the tip prior to welding helps the tip stay the same throughout the weld.
The way I do this is to set the AC balance to maximum cleaning and strike an arc on a piece of clean scrap aluminum. Then I used the foot pedal to increase amperage just enough to round the tip.
You can also swap the tig torch plug to DCEP to do this but if your AC balance does not go low enough on cleaning.
For thin aluminum, I use more of a tapered tip for crisper arc starts and more control at low amps.
4. Right cup setup

So what is the best cup setup for tig welding aluminum?
It really does depend on the application but for general shop fabrication from .020” to .500” thickness, a #5,6,7, or 8 cup will all get the job done.
A #5 standard cup with collet body is a favorite for a lot of folks.
Both standard bodies and gas lens setups work but a gas lens allows for a longer electrode extension for reaching tight spots while maintaining good gas shielding.
I really like to use a #6 gas lens for tig welding aluminum.
The main thing is to get the gas flow rate set right for the cup you are using.
5. Right gas flow rate

Most text books and authority web sites like Miller and Lincoln recommend 15-20CFH of pure argon for gas flow rate.
I think a better way to look at argon gas flow rate is 2-3 CFH per cup size.
Cup size is the biggest determining factor when it comes to gas flow rate.
Using 2-3 CFH here are the ranges for cups 5 thru 8.
#5 - 10-15CFH
#6 - 12-18CFH
#7 - 14-21CFH
#8 - 16-24CFH
- Using too much flow rate can cause a noisy and erratic arc.
- Too low a flow rate affects the cleaning zone and causes oxides in the puddle
6. Right filler rod
4043 and 5356 are the 2 main filler rods for aluminum and one or the other are used on the majority of aluminum jobs. There are many other filler rod choices that come into play for different alloys and situations.
The right filler rod for aluminum depends on several factors like:
- Grade of aluminum. 5052, 6061, 3003, 7005?
- Will the part be anodized after welding?
- What is the main consideration for the final weld? Is it strength?, absence of porosity? Color match?
- This filler rod chart is very useful but make sure to read the foot notes.
7. Right polarity and aluminum settings
AC or alternating current is the polarity setting for tig welding aluminum with pure argon shielding gas.
There are exceptions where aluminum is welded on DCEN using pure helium but helium has become very expensive and less readily available so DCEN aluminum welding is usually reserved for very thick aluminum where distortion must be tightly controlled.
Other settings like AC Balance and AC frequency are also important to get right.
AC balance controls the cleaning action that breaks up the oxides.
A good setting range is about 67-73% Electrode negative but some AC balance knobs are labled as % cleaning so that in that case a good setting would be 27% - 33% cleaning
AC frequency adjusts the arc focus and also affects heat input.
I usually use lower settings of 50-60hz for thicker aluminum and higher settings of 100-200hz for thinner aluminum.
Learn more about the primeweld tig325 tig welder here

8. Right amperage
The old one amp per one thousandths rule of thumb will get you in the ball park up to around .125” thickness but because aluminum is so thermally conductive, you often need more amperage at the start of a weld and less once the metal heats up. A foot pedal or finger amp control will allow you to adjust amperage on the go.
9. Right arc length
Rule of the thumb for arc length is to aim for an arc length that is the same as the electrode diameter or slightly less.
When you are tig welding aluminum, you will notice the height of the puddle changing every time you add filler rod. If your arc length is too tight, the puddle can rise and get on your tungsten.
The way I avoid this is to raise my torch just a bit while a dab filler. This technique works especially well on fillet welds like tee joints and lets me hold a very tight arc on the forward movement where I need penetration into the root, and a longer arc while I back into the puddle and dab filler rod.
10. Right angle
Torch angle should be around 10-15 degrees for most welds. If your torch angle is wrong, the problem is usually too much angle and rarely not enough angle.
If you find that the tip of your filler rod is balling and blobbing off, you might be using too much torch angle.
Fortunately torch angle is pretty forgiving as long as arc length is right.